How to Get Crystal Clear Resin 3D Prints Without Sanding. Gloss Coat Guide
Stop sanding for hours. The gloss coat technique turns cloudy resin prints into glass-like transparency in 10 minutes.
Compare prices & save today
Sort by $/kg, filter by PLA, PETG, ABS. Real prices from Amazon, Ebay & AliExpress and manufacturer stores—find the cheapest filament in seconds.
CompareIf you have ever tried printing with clear resin, you know the disappointment. Marketing photos promise glass-like transparency. What comes out of your printer usually looks like frosted plastic or a cloudy ice cube. Here is the secret to crystal clear results without hours of sanding.
The common advice? Sand it. Then sand it some more. Then polish it. But there is a better way. Here is the secret to achieving incredible transparency without spending hours with sandpaper. If you are new to resin, read our best resin 3D printers guide first. For vat care, see our 5 minute vat cleaning method.
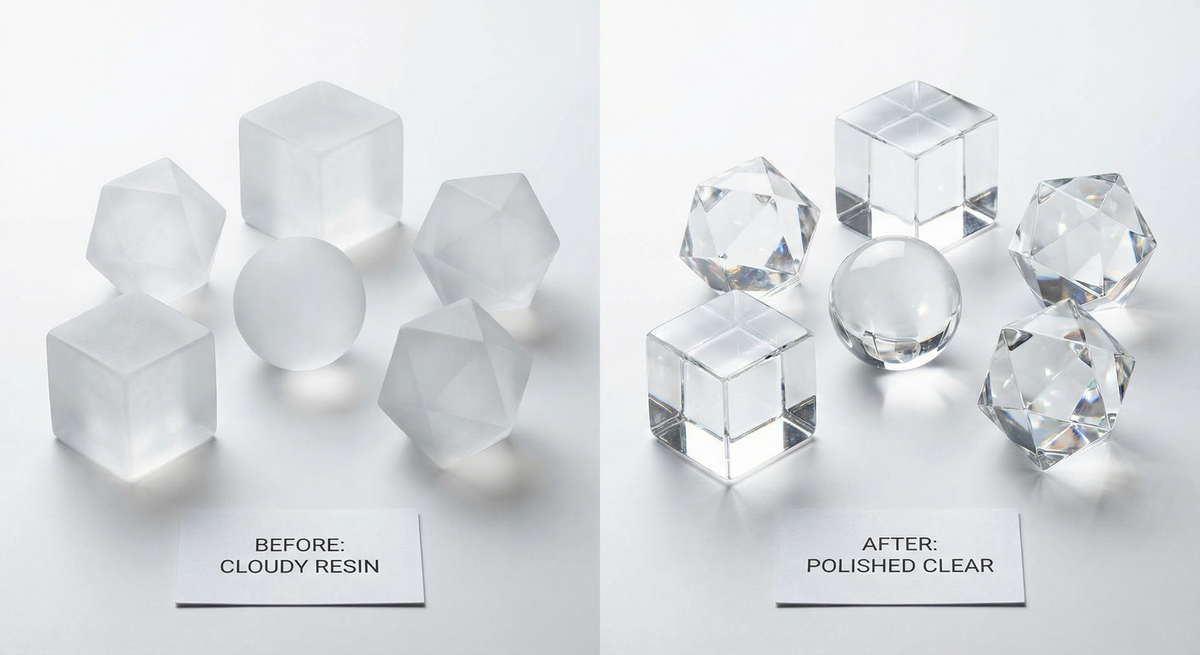
Before and After
Before the gloss coat, a clear resin print fresh from the printer looks frosty and white. Light scatters off the surface. It might remind you of a frosted bathroom window or a cloudy ice cube. Many people think something went wrong. Nothing did. This is how clear resin behaves straight off the build plate.
After washing with IPA and drying, the print stays frosty. That is normal. The magic happens when you spray the UV resistant gloss coat. Within seconds the frosted surface turns transparent. You will see light pass through instead of bouncing off. The transformation is dramatic. A print that looked like cheap plastic can look like glass or crystal. For more project ideas using this technique, check our 35 cool clear resin prints roundup.
What You Need
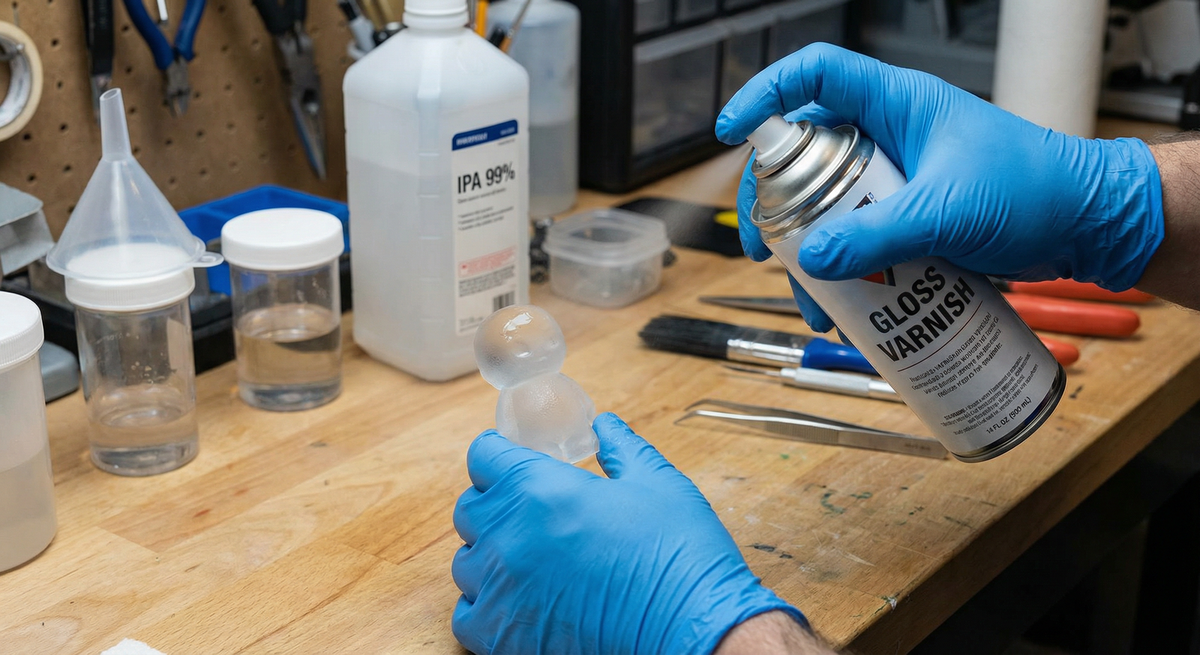
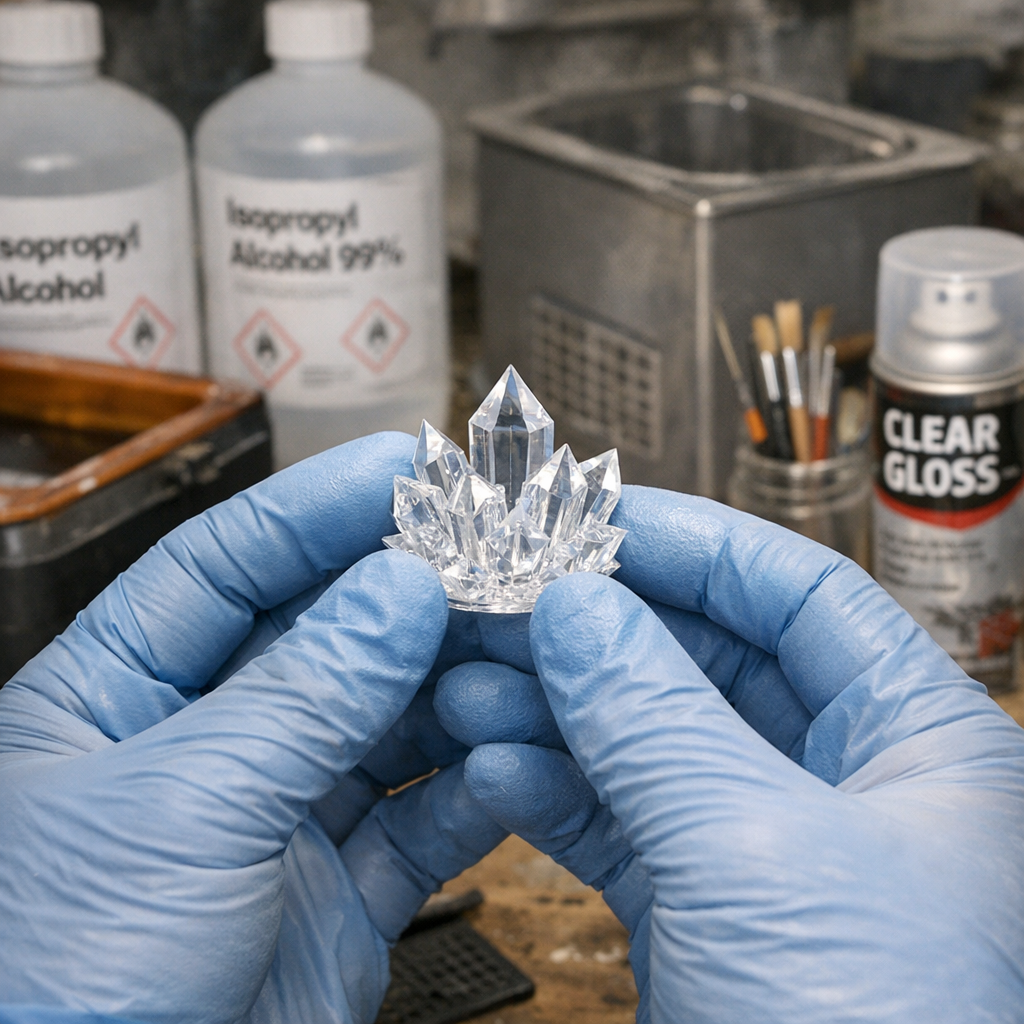
Transparent resin, clean isopropyl alcohol, a spray can of UV resistant gloss clear coat, and nitrile gloves. If you want to add color gradients, grab alcohol inks or resin dyes. That is it. No sandpaper, no polish, no buffing wheels. You probably already have most of this if you resin print. For a full resin setup breakdown, including wash and cure stations, see our best resin printers guide.
Why Are My Prints Cloudy?
To understand the fix, you have to understand the problem. When a resin print comes out of the vat, it is not smooth. It is covered in microscopic layer lines. When light hits these lines, it bounces off in random directions. That scattering is what your eye perceives as frosted or white. To get that glass look, you do not need to remove the layer lines. You just need to fill them in so light can pass through straight.
The gloss coat works because it has a refractive index close to the resin. Light passes through the interface instead of scattering. It is the same reason oil on water can look clear. You are not removing material. You are adding a layer that bridges the gaps. Premium resins like Siraya Tech Blu Clear can achieve good clarity even without coating, but the gloss method works with budget resins too.
The Gloss Coat Technique
The guide from 3D Printer Australia highlights that the most efficient way to achieve clarity is not by sanding. It is by adding a layer that matches the refractive properties of the resin. Here is the step by step process.
1. The Printing Process
Resin choice. The guide recommends standard clear resins such as Elegoo Transparent over water washable ones for the best clarity. Both can work though.
Any brand works: Elegoo, Voxelab, Anycubic. For best clarity, prefer standard transparent resins.
Amazon, Transparent ResinSettings. Clear resin allows UV light to bleed through more than opaque resin. Dial in your exposure settings to avoid bloating the print. Make sure it is solid. Elegoo resin settings and Anycubic resin settings are good references. If you struggle with support removal, our hot water support removal guide can help.
2. Cleaning
You cannot clear coat a dirty print.
- Wash thoroughly. Use clean isopropyl alcohol. If your IPA is dirty or cloudy from previous washes, that residue will dry on your print and leave white streaks. No amount of clear coat can fix that.
- Dry completely. Let the IPA evaporate entirely. The print should look frosty white and matte when dry. This is normal.
Pure 99% IPA is essential for cleaning. Great for cleaning FDM print beds too.
Amazon, IPA3. The Coloring Trick
In the viral Reddit post, someone printed the Crystal Golem by Clay Rade. The beautiful color gradients were not done by mixing dye in the vat. Instead use alcohol inks or resin dyes mixed with a little IPA. Brush or drop them onto the cured model. Let the colors bleed into each other organically. Because the surface is still microscopically rough, the dye grabs onto the texture and creates deep, rich colors. You can download the Crystal Golem for free on MyMiniFactory.
For gradients and shading on the cured model. Even two colors create a nice blended look.
Amazon, Resin Dyes4. Gloss Clear Coat
This is the game changer. Instead of sanding, you are going to spray it.
Use a high quality UV resistant spray. You can find it in automotive or hardware stores. The UV resistant part is vital. Clear resin yellows over time and this spray acts as sunscreen for your model.
Amazon, Clear Gloss SprayApplication. Apply thin, even coats. As the wet spray hits the frosted model, you will see it turn transparent instantly. The spray fills the microscopic layer gaps and creates a smooth surface for light to pass through.
Tips.
- Treat it like priming models for painting.
- Wear disposable gloves. This stuff has a potent smell.
- Apply several thin coats rather than one thick coat. More layers mean glossier.
- Spray from 15 to 30 cm away.
5. Curing
Do not over cure. Clear resin yellows if left in the curing station too long. Cure it just enough so it is safe to handle. Then apply your UV resistant coat. The coating will help protect it from further yellowing.
Store finished prints away from direct sunlight. A shelf or display case out of the window path works best. Even with UV resistant spray, years of direct sun will eventually yellow most clear resins. Indoors and out of light, they stay clear for a long time.
Sanding vs Gloss Coat
Sanding clear resin is difficult because if you miss even one tiny spot or leave one scratch from a lower grit sandpaper, it will show up as a blemish in the final clear finish. Using a spray clear coat fills every crevice evenly. Here is how the two methods stack up.
| Sanding | Gloss Coat Spray | |
|---|---|---|
| Time | 2 to 3 hours | About 10 minutes |
| Difficulty | High. One scratch ruins it. | Low. Even coats, minimal skill. |
| Tools needed | Sandpaper 400 to 7000 grit, polish, microfiber | IPA, gloss spray, gloves |
| Consistency | Uneven. Easy to miss spots. | Uniform. Spray reaches everywhere. |
| Result | Can match gloss coat if perfect | Glass-like transparency |
| Cost | Cheap. Sandpaper only. | Spray can about 6 to 15 dollars |
For most makers, gloss coat wins. It turns a 3-hour post-processing job into a 10-minute job. If you are debating resin vs filament overall, see our resin vs filament guide.
Troubleshooting Clear Resin
- Still cloudy after gloss coat. Your IPA was probably dirty. Cloudy or reused IPA leaves residue that dries white. Use fresh 95% or higher IPA. Wash again and respray. If the vat is contaminated, our vat cleaning settings guide helps.
- White streaks on the print. IPA residue. Wash longer in clean IPA. Dry fully before spraying. Make sure you are not touching the print with bare hands before the coat.
- Yellowing quickly. Over-curing or sunlight. Cure just enough to handle. Use UV resistant spray. Store prints away from windows. Budget resins yellow faster than premium ones.
- Gloss coat runs or pools. You sprayed too thick. Use thinner coats. Hold the can 15 to 30 cm away. Let each coat dry before the next.
- Alcohol ink bleeds too much. Use less IPA in the mix. Apply smaller amounts. You can fix mistakes by dipping in IPA and wiping, then reapplying.
- Print feels sticky after coating. The coat is not fully dry. Wait longer. Avoid handling for at least 30 minutes. Some sprays need 24 hours to fully cure.
Frequently Asked Questions
- How do I make my clear resin prints transparent?
- Use a UV resistant gloss clear coat spray. Wash prints in clean IPA first and dry completely. Then apply thin coats. The spray fills microscopic layer lines so light passes through instead of scattering.
- Why are my clear resin prints cloudy?
- Microscopic layer lines scatter light. IPA residue or dirty wash liquid also causes cloudiness. Wash with fresh IPA and dry fully before applying gloss coat.
- Is sanding or gloss coat better for clear resin?
- Gloss coat is faster and more consistent. Sanding takes 2 to 3 hours and one scratch ruins the finish. Spray coating takes about 10 minutes and fills every crevice evenly.
- Why does my clear resin turn yellow?
- UV light yellows clear resin. Over-curing and sunlight cause it. Use UV resistant gloss spray as protection. Cure just enough to handle, then apply the coat.
- Can I add color to clear resin after printing?
- Yes. Use alcohol inks or resin dyes mixed with IPA. Brush or drop onto the cured model. Colors bleed organically into the rough surface for gradients. The Crystal Golem on MyMiniFactory is a great test model.
- What IPA concentration for cleaning clear resin?
- Use 95% or higher. Dirty or cloudy IPA leaves white streaks that clear coat cannot fix. Always use fresh IPA for best transparency.
Summary Checklist
- Print with standard settings
- Wash with pristine alcohol
- Add color inks directly to the model if you want
- Spray with UV Resistant Gloss Clear Coat
- Enjoy the glass look
Stop overpaying for 3D filament!
Compare brands and save today. Our tool shows real prices from Amazon, Ebay, AliExpress and manufacturer stores.
Compare brands & save today