How to Calculate 3D Printing Costs in 2026: Pricing Formula That Actually Works
Use one practical formula for material, electricity, depreciation, and failure buffer to stop underpricing your prints.
Compare prices & save today
Sort by $/kg, filter by PLA, PETG, ABS. Real prices from Amazon, Ebay & AliExpress and manufacturer stores—find the cheapest filament in seconds.
Compare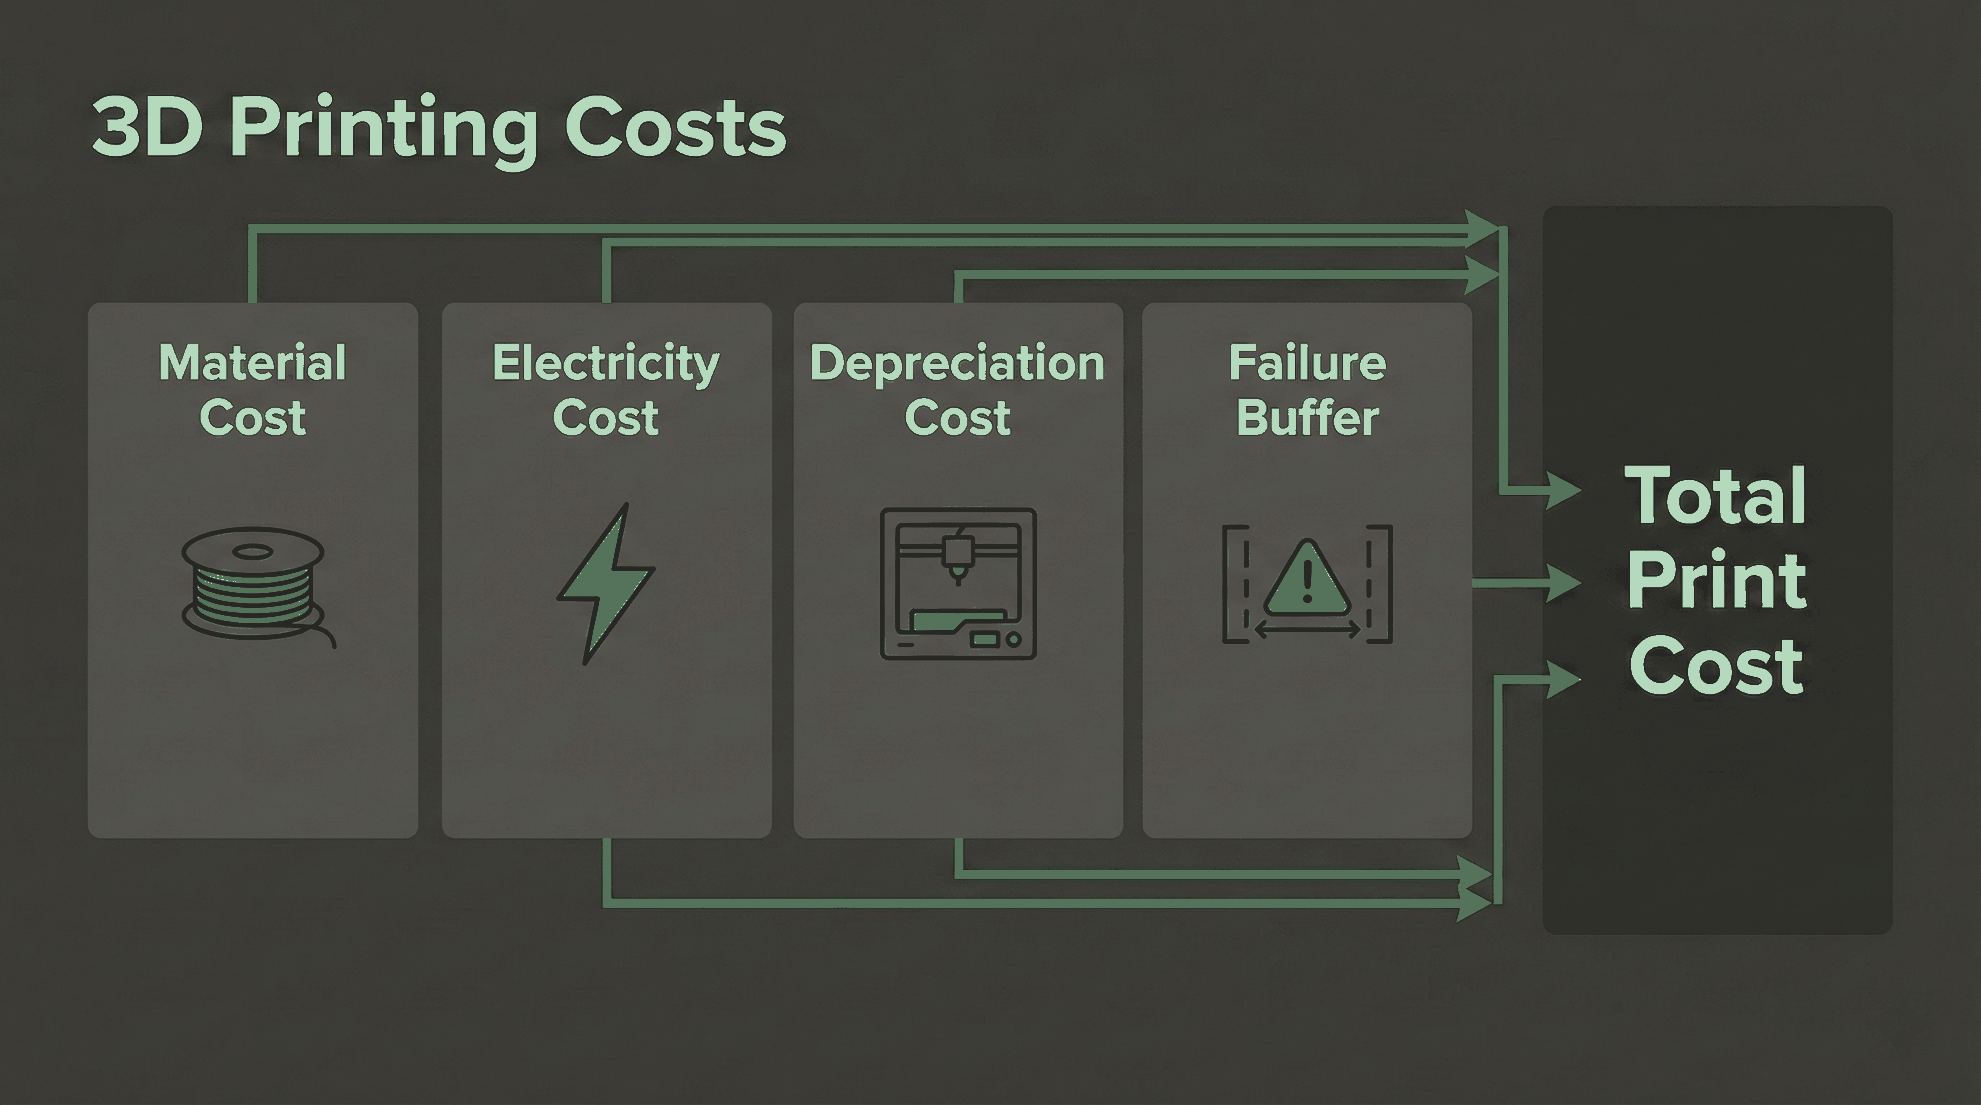
A 3d printing cost calculator is only useful if your inputs are real. Most makers underprice prints because they count filament and ignore electricity, machine wear, and failed jobs. If you want to calculate cost of 3d printing accurately in 2026, use a three-pillar formula with measured data, not guesses.
This guide shows the exact formula we use, how to collect each value in less than 30 minutes, and how to turn your hobby pricing into side-hustle pricing. For material-specific tradeoffs, see our PLA vs ABS vs PETG value guide. For market benchmarks, check our price per gram breakdown.
What Is the 2026 3D Printing Cost Formula?
Short answer: Use this formula for every quote: Total Print Cost = Material Cost + Electricity Cost + Depreciation Cost + Failure Buffer. Then add your target profit margin.
Most hobby quotes ignore at least one pillar. That is why a print that looks profitable at $4 can actually cost $5.20. The gap compounds fast when you take multiple client jobs in a month. A simple spreadsheet or your preferred 3d printing cost calculator can automate this once you set baseline numbers.
| Component | How to Measure | Typical Range |
|---|---|---|
| Material Cost | Slicer grams or scale verification | $0.40 to $3.50 per print |
| Electricity Cost | Smart plug kWh x local rate | $0.05 to $0.80 per print |
| Depreciation Cost | Printer purchase cost divided by lifetime hours | $0.20 to $2.00 per print |
| Failure Buffer | Historical failed-print percentage | 5% to 20% uplift |
Pillar 1. Material Weight Cost
Material cost is simple on paper but easy to underestimate. The slicer shows grams for the model, but real usage also includes skirt, brim, purge lines, supports, and occasional calibration waste.
Use this equation: Material Cost = (Print Weight in g / 1000) x Filament Price per kg. If your part uses 84 g and filament costs $18/kg, raw material is $1.51. Add a 5% process waste factor for daily operations and it becomes $1.59.
To avoid drift, verify one print per week with a digital precision scale. Slicer estimates can differ by 2% to 8% depending on machine calibration and flow settings. We track spool price changes with our cheapest filament market guide, because material price volatility changes profitability faster than most makers expect.
A 0.01 g scale helps validate slicer estimates and separate real material use from guesswork. If your measured weight is routinely 4% above slicer output, update your quoting factor immediately.
Amazon, Digital Precision Scale 0.01 gPillar 2. Electricity Consumption Cost
Electricity is smaller than material for most jobs, but it is never zero. Long PETG jobs, enclosed printers, and heated chambers can push power cost high enough to matter in tight-margin quotes.
Use this equation: Electricity Cost = Energy Used (kWh) x Local Electricity Rate. A 7-hour print that consumes 0.62 kWh at $0.28/kWh costs $0.17 in power. The cleanest way to capture this is a smart plug that logs kWh per job.
Local rates vary heavily by market and contract. If you need benchmark data, see current references from the U.S. Energy Information Administration and regional utility tariffs. For EU readers, household and small business price structure differs by country and fixed charges often dominate, so track your real bill rate instead of relying on a generic average.
A watt-monitoring smart plug gives per-print kWh logs. This turns your electricity input from a fixed guess into measured data and makes your cost calculator trustworthy.
Amazon, Smart Plug Energy Monitor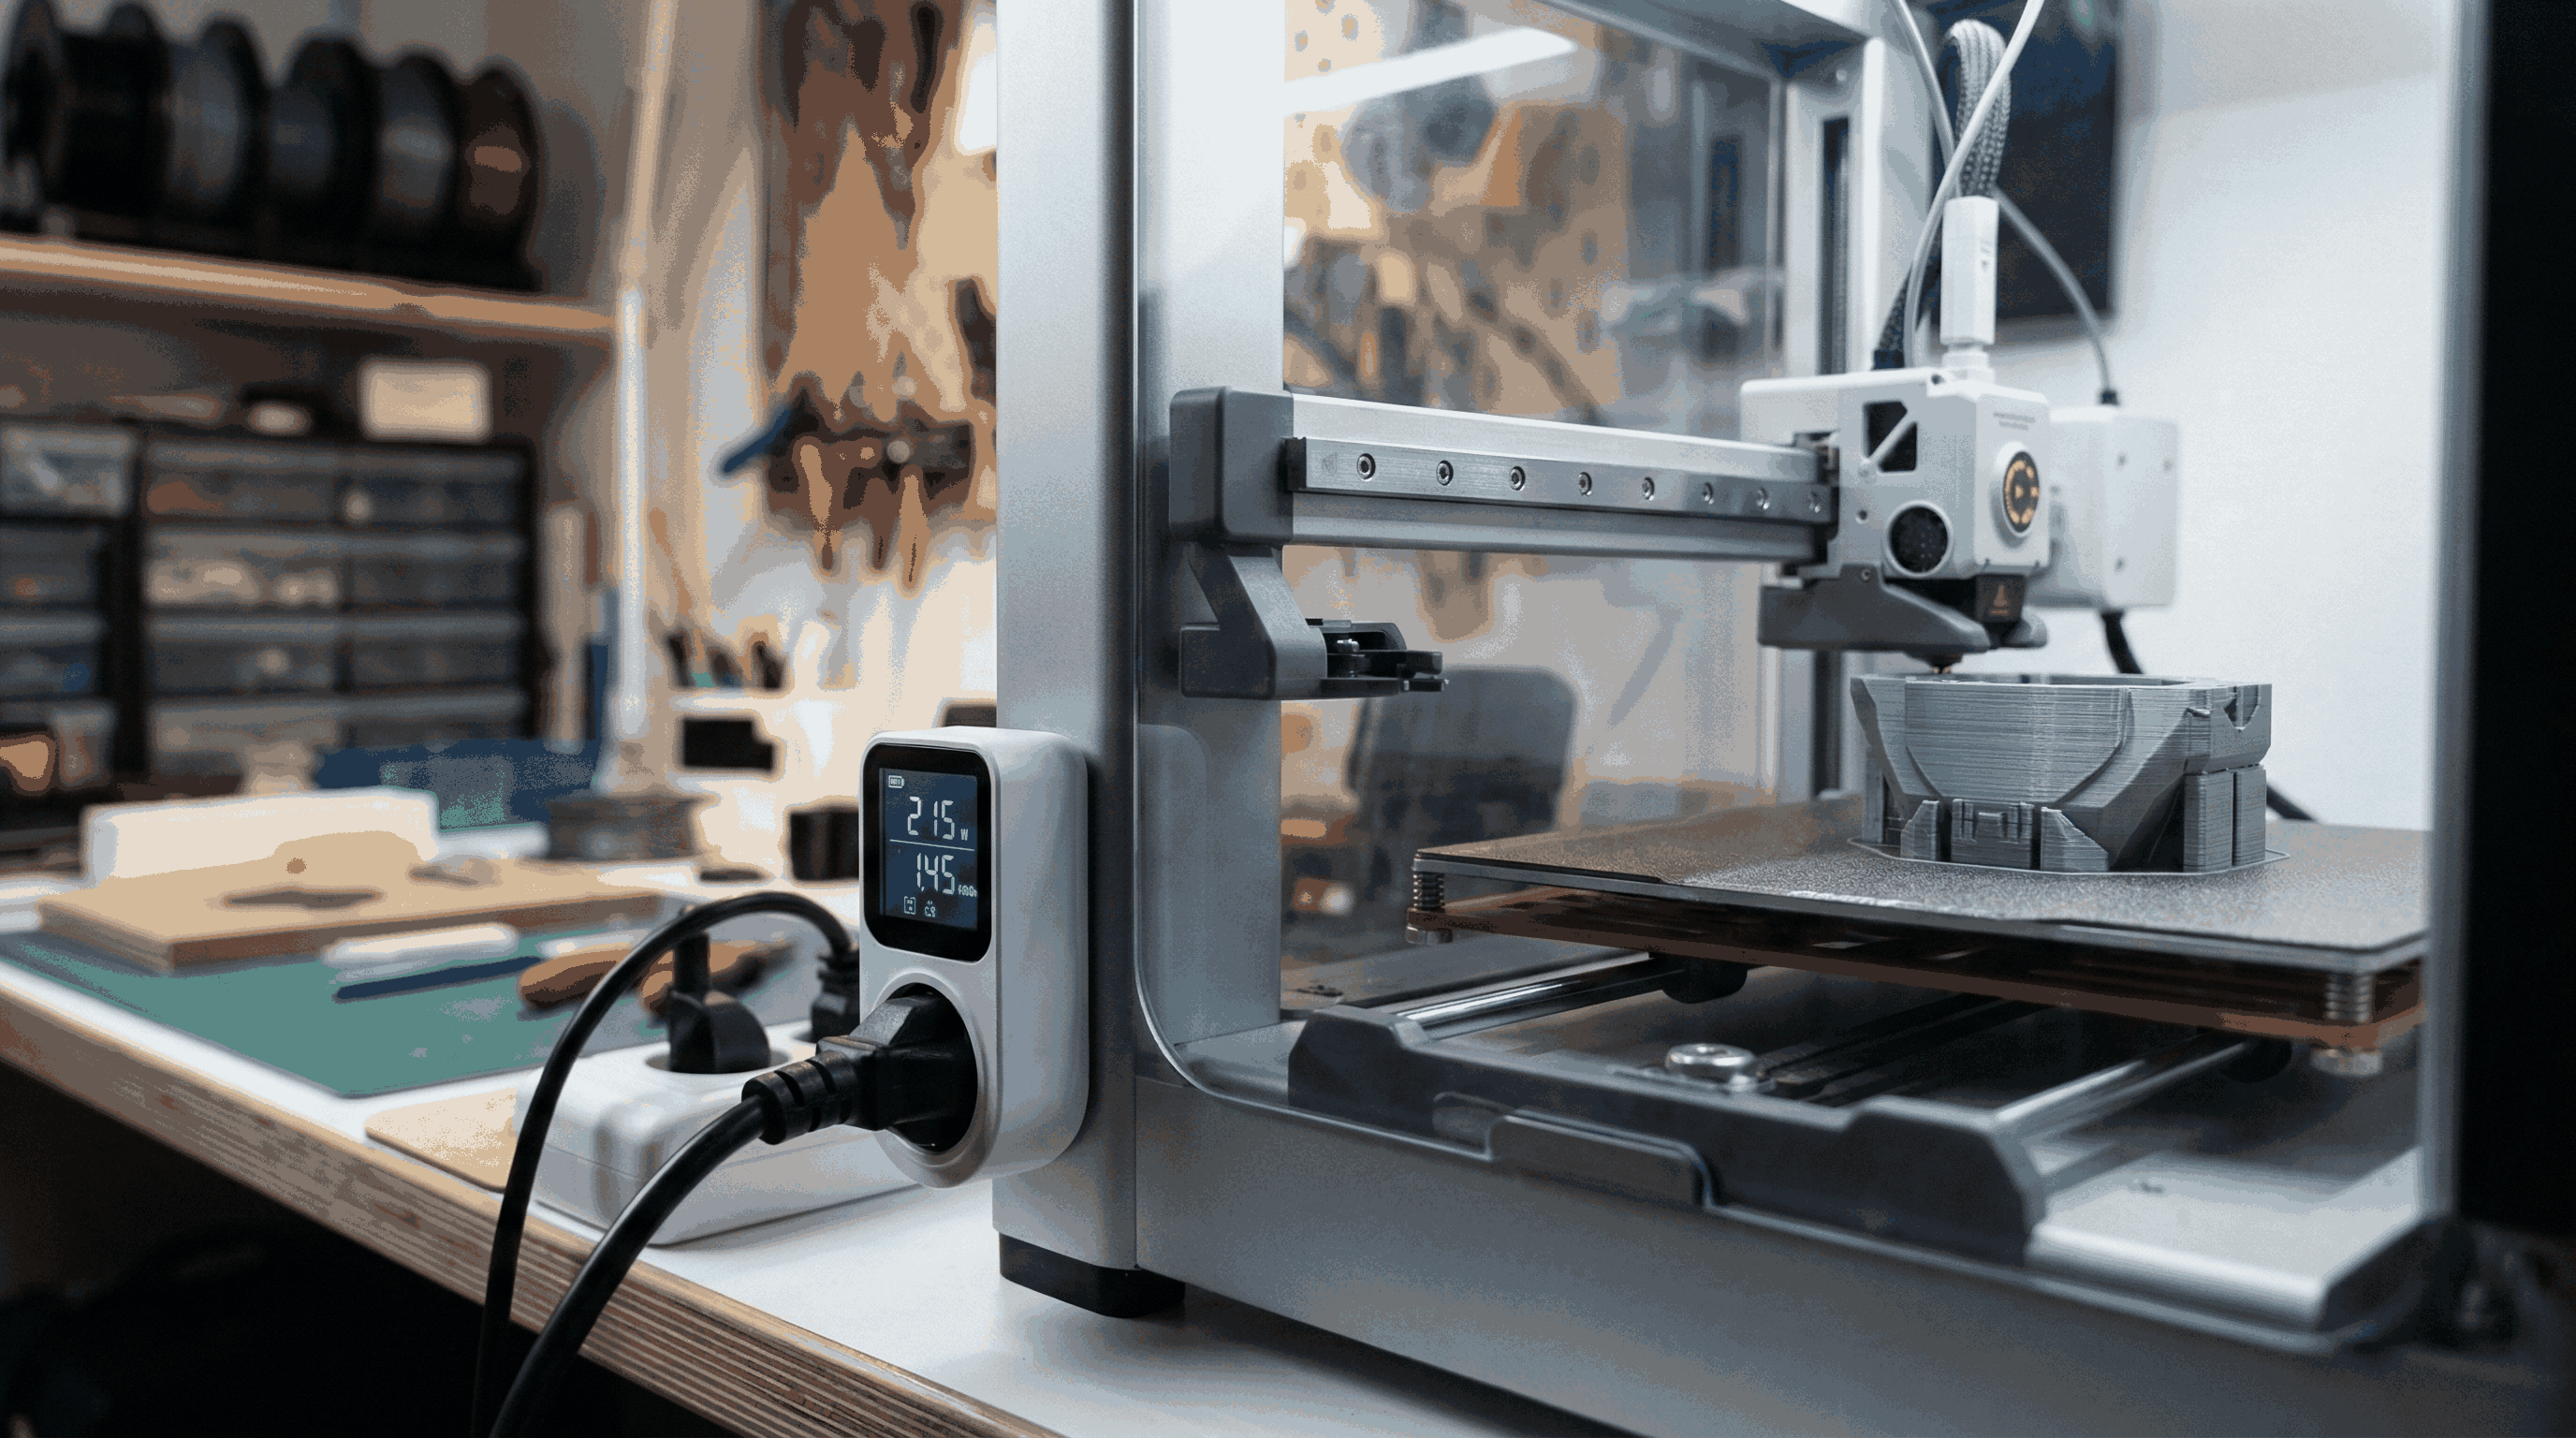
Pillar 3. Machine Depreciation Cost
Depreciation is the pillar most hobbyists skip, and it is the reason many side hustles stall. A printer is a production asset. Every hour of printing consumes part of its useful life.
Use this equation: Hourly Depreciation = Printer Cost / Expected Lifetime Hours. If your printer costs $600 and you assume 3000 productive hours, depreciation is $0.20/hour. For a 7-hour print, depreciation is $1.40.
Add wear items separately if they are frequent for your workflow: nozzles, build surfaces, PTFE tubes, and occasional hotend parts. We keep wear items in a small maintenance bucket at 3% to 6% of monthly print revenue. This is close enough for quoting without making the formula unreadable.
For reference on maintenance intervals and reliability patterns, check manufacturer guidance such as the Bambu Lab wiki and your printer's service manual.
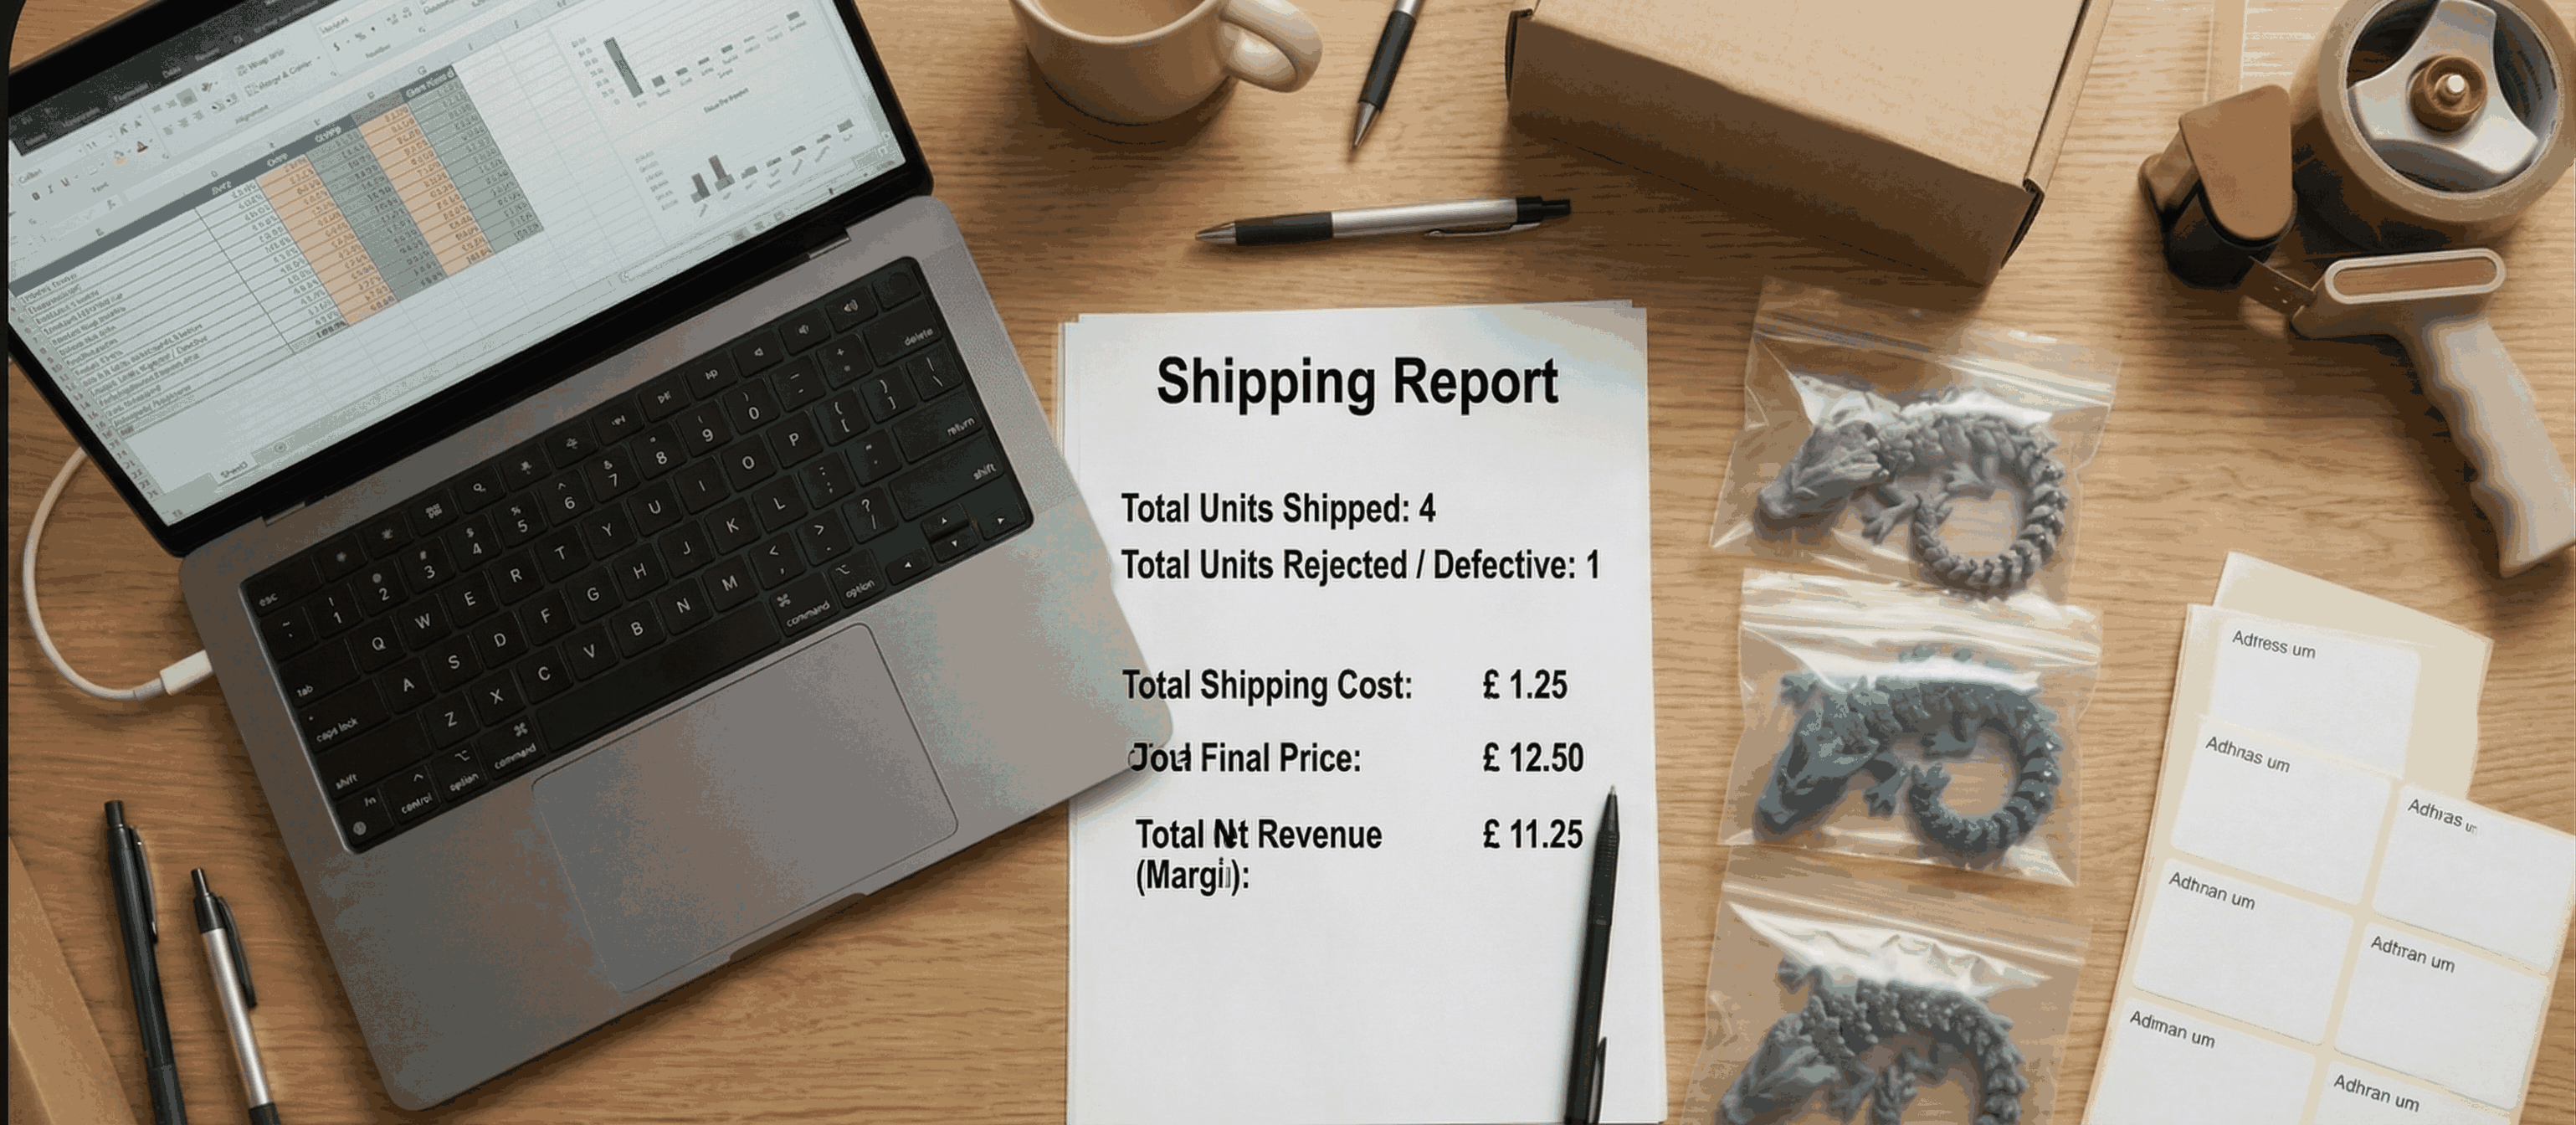
Complete Worked Example for One Print
Assume a functional bracket with these measured values: 132 g material, 9.5 hours print time, 0.94 kWh total energy, filament at $21/kg, electricity at $0.30/kWh, and a $700 printer with 3500 lifetime hours.
- Material: (132 / 1000) x 21 = $2.77
- Electricity: 0.94 x 0.30 = $0.28
- Depreciation: (700 / 3500) x 9.5 = $1.90
- Subtotal: $2.77 + $0.28 + $1.90 = $4.95
- Failure buffer 12%: $4.95 x 1.12 = $5.54
Your true production cost is $5.54, not $2.77. If you quote $6, your margin is too thin after packaging and handling. If you quote $8.50, you keep room for labor and business growth.
| Step | Value | Result |
|---|---|---|
| Material | 132 g at $21/kg | $2.77 |
| Electricity | 0.94 kWh at $0.30 | $0.28 |
| Depreciation | $700 printer, 3500 h life, 9.5 h job | $1.90 |
| Failure Buffer | 12% | $0.59 |
| Total Cost | All pillars included | $5.54 |
How to Add Profit Margin Correctly
Cost is not price. After computing total cost, add margin based on demand uncertainty, reprint risk, and post-processing effort. For simple parts, 30% to 50% margin can work. For custom one-off design requests, 80% to 150% is common.
Use this quick formula: Selling Price = Total Cost / (1 - Target Margin). If cost is $5.54 and target margin is 40%, price is $9.23. Round strategically to $9.50 or $10 based on market positioning.
Keep labor as a separate line when design or finishing time is significant. Time is money. If post-processing takes 20 minutes and your shop rate is $24/hour, add $8 labor. That one line can be the difference between growth and burnout.

Common Pricing Mistakes That Kill Profit
- Using only slicer filament grams: misses supports, failed starts, and waste.
- Assuming zero machine wear: hides depreciation and replacement parts.
- Copying competitor prices blindly: their cost structure might be different from yours.
- Ignoring failure history: if your failure rate is 15%, your quote must reflect it.
- No margin policy: pricing by guess makes revenue unstable month to month.
Recommended Tools to Build Your Cost System
You only need three tools to get clean numbers: a precision scale for weight validation, a smart plug for kWh logs, and reliable filament with stable diameter tolerance. If you buy in volume, premium bundles can reduce cost variance across jobs.
Bulk bundles stabilize your per-kg cost and reduce emergency purchases at higher prices. Choose brands with consistent diameter tolerance and documented material specs.
Amazon, Premium Filament BundleFAQ
- How do I calculate cost of 3d printing quickly?
-
Short answer: Add material, electricity, depreciation, and a failure buffer. Then apply margin to get final selling price.
Detailed: Material-only pricing underestimates true cost. Use measured grams, smart plug kWh, and an hourly depreciation baseline. This gives stable quotes for side-hustle orders.
- What is a good failure buffer percentage?
-
Short answer: Start with 10% if your process is stable, then adjust from your real failure history.
Detailed: New setups or complex geometry often need 15% to 20%. Mature workflows with tuned profiles can run at 5% to 8%. Review monthly and update your calculator.
- Is electricity a big part of FDM print cost?
-
Short answer: Usually smaller than material, but not negligible for long prints and high tariffs.
Detailed: Typical FDM jobs spend cents to under one dollar in electricity, yet recurring jobs amplify it. Measured kWh still matters for accurate quoting and trend tracking.
- How many lifetime hours should I assume for depreciation?
-
Short answer: Use 2500 to 5000 productive hours based on printer class and maintenance quality.
Detailed: Entry-level machines may trend lower if heavily loaded. Well-maintained midrange printers can exceed 4000 productive hours. Use conservative assumptions to protect margin.
- Should I include labor in a 3d printing cost calculator?
-
Short answer: Yes, if setup, support removal, sanding, or design changes take real time.
Detailed: Labor often exceeds material on custom jobs. Keep labor as a separate line so customers understand value and your pricing stays sustainable.
- What margin should a beginner side hustle target?
-
Short answer: A practical starting point is 35% to 50% margin on repeatable parts.
Detailed: Use higher margin for one-off custom pieces because communication and reprint risk are higher. Reassess quarterly as your failure rate drops and demand grows.
- How often should I update filament prices in my calculator?
-
Short answer: Update monthly, or immediately when you switch supplier or buy at a new bulk rate.
Detailed: Material price changes hit margin quickly. Keeping rates current prevents underquoting and helps you decide when bulk purchases improve profitability.
- Can I use one formula for PLA, PETG, and TPU?
-
Short answer: Yes, the structure stays the same. Only material price, speed, and failure buffer usually change.
Detailed: TPU may print slower and can increase print time cost. PETG can require more tuning early on. Keep material-specific presets in your spreadsheet or calculator.
Conclusion
Accurate pricing is a system, not a guess. Track grams, kWh, and machine hours, then add a realistic failure buffer and margin. That one change can move you from inconsistent hobby quotes to reliable side-hustle profit. If you want better material baselines, compare live prices with our 3D filament price tool.
Stop overpaying for 3D filament!
Compare brands and save today. Our tool shows real prices from Amazon, Ebay, AliExpress and manufacturer stores.
Compare brands & save today